


React Hooks are the special functions that let us tap into React features in a functional component. As we all know, React is a powerful library that lets us build fast and reusable user interfaces. These interfaces have special features that we couldn't have access to in a functional component, hence the advent of Hooks.
Hooks are JavaScript functions used in React as components. You cannot use Hooks in Vanilla JavaScript, and neither can you use them in class-based components. Hooks can only be used in a React Functional Component. State in Hooks can be of any data type: object, array, null, string, number etc, unlike in classes where the data type has to be an object. Now, let's get to the Hook of the day; useState.
What is useState?
useState is the hook that helps you add and manage the state in a React application. It consists of a destructured pair of values where the first value is the current state of the variable, while the second is the updater function. In classes, you can use this.state to update the state of a function, but in React function component, you use useState to do the same job. useState makes state easier to understand access.
useState is the most used Hook out there, and also the simplest of all the Hooks. Unlike JavaScript where you have to manually grab the HTML element you want to update, useState does that for you. State is kept inside a hook and accessed from the component where you call the hook; what this means is you can only call the hook inside the component where it was created, and not outside of it.
Rules of using useState
1. Always follow the pascalCase naming convention when naming your variables.
2. Always make sure your second variable starts with set.
3. State can be of any data type.
4. Only use hooks in a function component.
5. Never directly mutate state.
Why useState?
1. You don't have to manually update the state.
2. When the state updates, the page does not refresh, unlike vanilla JavaScript.
3. Updating state is very fast.
Now let's get to the practical understanding of the topic at hand.
Importing useState
To use useState, you have to import it into the component where you will be declaring it, or you can use React.useState to declare your variable. In this class, we will be importing it as it's most likely the method you will see being used.
import React, {useState} from 'react'
useState is a named export destructured from the React library, hence why it's wrapped in curly braces. When we move on to other hooks, they will be wrapped similarly in curly braces.
Declaring a useState variable
useState has two variables: the initialValue and the updating function. These variables are destructured in an array, with the first variable being assigned the value in the useState function, while the second variable is the function that updates the state. I will make this explanation clearer in the example below.
To declare a useState hook, you run the following code:
const [state, setState] = useState(initialValue)
You are not obliged to name your variables state and setState. You can name them anything. It could be oranges and setOranges. Just make sure to follow the naming convention by letting your second variable start with set.
You are allowed to have as many states as possible in a component. For instance, if you have a form component where you have to take the name, address and age of the user, you can simply do it like this.
import React, {useState} from 'react'

const userForm = () => {

    const [name, setName] = useState("John")
    const [address, setAddress] = useState("14, mayne street, Indiana")
    const [age, setAge] = useState(28)

  return (
      <div>
          <input type='text' value={console.log(name)}/>
          <input type='text' value={console.log(address)}/>
          <input type='number' value={console.log(age)}/>
    </div>
  )
}

export default userForm
From the code above, you will understand better what I mean when I say the first variable is assigned the initialValue set in the useState function.
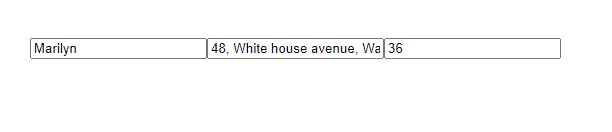
Let's check the console to see its output.

With the above result, I want to be sure you have an inkling of an idea of the value the first variable is assigned to. If the useState("John") function for the name was an empty string like this useState(" "), that will be the initialValue of name. The same applies to the rest of the state values.
Updating a useState variable
To update the value of the above example, we will be using the second variable, which is the function updater. There will be some addition to the code, as we will be using events to update the function. Well, as you know, events are the actions that place to make a static website an interactive one.
Now let's get to it. We will be using the same code as above, but with some changes.
import React, {useState} from 'react'

const userForm = () => {

    const [name, setName] = useState("John")
    const [address, setAddress] = useState("14, mayne street, Indiana")
    const [age, setAge] = useState(28)

  return (
      <div>
          <input type='text'
              value={console.log(name)}
              onChange={ ((event)=> setName(event.target.value))} />
          <input type='text'
              value={console.log(address)}
              onChange={ ((event)=> setAddress(event.target.value))}/>
          <input type='number'
              value={console.log(age)}
              onChange={ ((event)=> setAge(event.target.value))}/>
    </div>
  )
}

export default userForm
From the code, we can see the onChange event being called. And inside the onChange event, we are using the second variable for each state to update the state from the initialValue.
To update the state with the onChange event, we have to use a prop which could be named event as in our case, or e or ev as some people do. It's just to note that an event is taking place in the function. After all of this is done, you can type in your input box and watch the state update. Take a look at my input box and the console below.
And in the console, it has been updated to this value in my input box. You can try it too, with a different input.

From the example above, we used string and number as our data types. You can use other data types as well and not just these. I'll declare some new states with other data types so you don't get confused about what they may look like.
import React, {useState} from 'react'

const userForm = () => {

    const [name, setName] = useState("John")
    const [address, setAddress] = useState(null)
    const [age, setAge] = useState(28)
    const [scores, setScores] = useState({ 'English': 75, 'Science': 64 })
    const [favoriteFood, setFavoriteFood] = useState(['rice', 'beans', 'cereal'])

  return (
      <div>
          <input type='text' value={console.log(name)}/>
          <input type='text' value={console.log(address)}/>
          <input type='number' value={console.log(age)}/>
          <input type='number' value={console.log(scores)}/>
          <input type='number' value={console.log(favoriteFood)}/>
    </div>
  )
}

export default userForm
Let's look in the console to see our output as we have used different other data types.
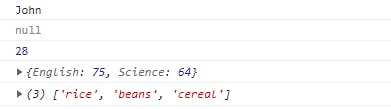
There isn't much difference in updating these other data types. The processes are the same. Just create an input element in your JSX for them and update them accordingly.
Hope this was helpful. If you have any questions, please feel free to ask me anytime. Also, don’t forget to follow me and like this tutorial.
Thanks and have a great day.